We often think of sailing as a naturally green sport. It does not burn fossil fuel. Uses the natural power of the wind and brings us close to that most precious of natural resources, water. There is more sailors can and must do to assure that joys of sailing are available for generations to come. The America's Cup World Series has partnered with Sailors for the Sea to raise awareness of the state of the world's oceans to to be good stewards of our waters through Clean Regattas, as seen in the clean-up day held earlier this week at the AC World Services event in Cascais, Portugal.
As I reflect back on my little restoration project, I see that it too small contribution to sustainable sailing. By fixing up an old boat, I kept a large volume of waste out of a local landfill (the likely destination of the boat, if I had not undertaken its restoration). The production of a new vessel would have consumed far more energy and produced far more waste, than my restoration efforts. I encourage others to look around their neighborhoods for neglected boats and under take the clean and restoration effort yourself. It is incredibly rewarding, cost-effective and good for the environment.
Friday, August 12, 2011
Wednesday, July 20, 2011
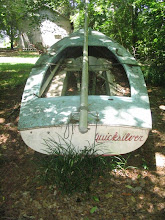
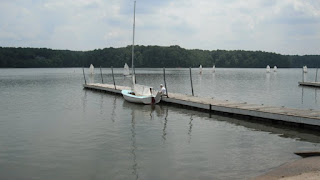
Quicksilver's first sail in 12+ years
My son Will and I took the boat out on a near-by lake on June 29, 2011. She performed beautifully. Unfortunately, the winds were light and variable and it was in the 90s, so we spent much of the time drifting and baking. When the puffs came, she sailed true with little to no weather helm. I look forward to the fall, when the winds are more predictable and its a bit cooler.


The major work is Complete!
I have been delinquent in posting my progress. The work has been done for a month or more, so let me catch you up. Completed the refinishing of the teak (2-3 coats of West System epoxy w/ 207 Hardener followed by 3-4 coats of varnish, with 0000 steal wool between coats) and reinstalled. Added new turning blocks and cam cleats on the deck on either side of mast for the head sail sheets. Added new blocks for main sheet and replaced all running rigging including eye splicing new halyard lines to the original wire halyards.. Replaced the plywood backer that support the rudder and glassed in the new wood within the aft lazarette. Installed new sheaves in mast head for main halyard and sealed masthead to prevent water from getting should I dump. This will hopefully help prevent her form turning turtle. I then got some friends to help me get her back on the restored trailer and out of the garage. It took some time to adjust the trailer rollers and bunks to properly support the hull. I used a couple of scissor jacks form my cars to raise and lower the mounts until I was happy with the load distribution and placement. The jacks made it easy to make adjustments without having a small army of folks to lift and hold the boat. A few minor items and she is ready to sail.


Thursday, May 26, 2011
On the last leg, homeward bound
Today was a day of very visible progress. I painted the new cockpit floor with Kiwi-Grip, non-skid. It went on just like the instructions and other reviews said it would (easy). It looks great. I just need to do a little touch up to make it look truly finished. You apply it with a putty knife and then roll it out with a special plastic mesh roller cover, which gives it its texture. I used a piece of a Scotchbrite pad to texture it in tight places.

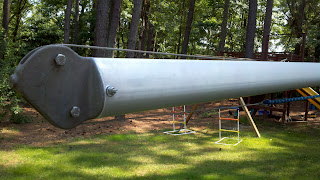
I completed the eye-splice (using Brion Toss' method and tool - Love the tool!) on the main halyard and attached the masthead and halyard. I also attached the new jib halyard and block along with the headstay and shrouds. The mast is heady to be stepped! I gave the boom a thorough cleaning including wet sanding with 400 grit and rub down with 0000 steel wool. I it is badly oxidized in some areas, but it is solid. All and all a really good day. Not long now and she's back in the water.


I completed the eye-splice (using Brion Toss' method and tool - Love the tool!) on the main halyard and attached the masthead and halyard. I also attached the new jib halyard and block along with the headstay and shrouds. The mast is heady to be stepped! I gave the boom a thorough cleaning including wet sanding with 400 grit and rub down with 0000 steel wool. I it is badly oxidized in some areas, but it is solid. All and all a really good day. Not long now and she's back in the water.


Monday, May 23, 2011
More progress :-)
It was a hot and humid day, so varnishing was not in the cards. I was able to sort out the placement of the turning blocks and cleats for the jib sheets on either side of the mast, cut, fit and epoxy coat 1/4" plywood backer boards for said blocks and cleats, and reattach the port rub-rail around mid-ship. Evidently, there had been a significant impact on that rail in the boats past life. The rail was scratched and severely gouged in one place and four of the rivets had been sheered off, leaving the rail bent and bowed out. I drilled out the bad rivets and replaced them with counter-sunk SS machine screws with washers, lock washer sand nuts on the inside. Cranked the screws tight and a few passes with a file on the aluminum rail and it is almost like new. Tomorrow, I will glass in the rudder backer and mount the blocks and cleats mentioned above.
Sunday, May 22, 2011


Friday, May 20, 2011
ARRRGGG!

No, it is not Talk Like a Pirate Day. I just discovered more rot on the boat. As I was preparing to add in am aluminum backing plate to reinforce the mainsheet bail/traveler on the stern, I discovered that the plywood backing that was glassed in at the factory to reinforce the rudder attachment points had rotted out. I shouldn't be surprised. As it was sitting stern-down collecting water and debris for years, all the water ran down hill to this point. I guess the good news, is that I think I only need to replace the section behind the rudder and not all the way across the top of the stern.


Subscribe to:
Posts (Atom)